
CardsCouture Creations AdhesiveDamask DelightEmbossing FoldersGemstonesGlitzin' Glamour Glitter GlueLauren TomecekNesting DiesPaper PadsToolsWho What Wear
Wishing You a Happy Birthday by Lauren Tomecek
You can never have too many spare birthday cards in your stash for those emergency situations, so that is what I've chosen to create for my second DT project this month.

1/ Trim a piece of black cardstock 13.5cm x 23cm and fold in half.
2/ Die cut the largest Scallop Rectangle from Damask Delight paper and adhere to the front of the card with double sided tape.
3/ Create your flower embellishments:
a) Using the Roses nesting dies, cut 3 x the smallest and 3 x the second smallest shapes per flower you want to create.
b) Paint the edges with white gesso.
c) On the + and X axis of the roses cut halfway to the centre, making eight cuts per die-cut.
d) Spritz all the petals with water.
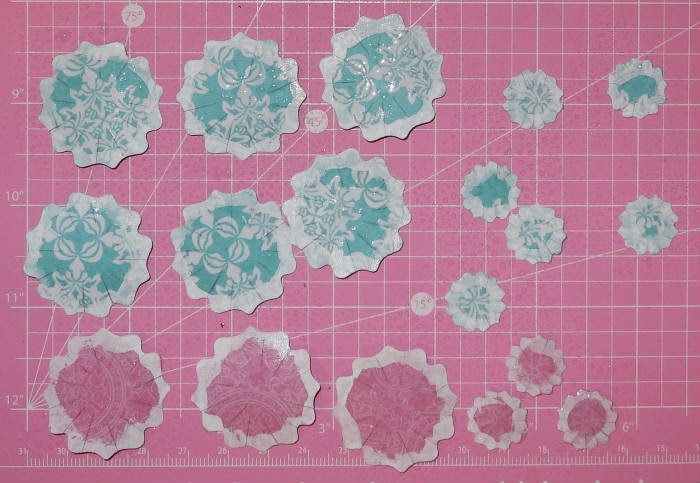
e) Layer your petals into a cluster and pierce through the centre. Thread a stamen through the hole and adhere at the back to keep the layers together.
f) Curl the individual petals around the stamen and leave to dry.
4/ Cut a 9.5cm x 3.5cm strip of black Core'dinations Cardstock with a blue core, cut into a banner shape. Emboss this with the Jo Jo embossing folder, making sure it comes through with the raised design on the black side. Take your sanding block and gently rub this over the cardstock to reveal the blue core in the embossed areas. Adhere to the left of the card.
5/ Cut a length of pink washi tape into a banner shape and adhere slightly overlapping the black banner.
6/ Stamp your sentiment on white cardstock and cut to size. Apply some Glitzin Glamour to one of the words for added sparkle. Ink the edges of the card. Apply Gemstones to corners.
7/ Mount the sentiment on double sided foam and adhere overlapping the two banners.
8/ Adhere the flowers over the top right corner of the sentiment.
9/ Doodle a white border around the whole card.


Couture Creations Materials List:
CO723545 12" x 12" Paper Pads, Damask Delight
CO723218 Nesting Dies, Roses
CO723047 Nesting Dies, Scallop Rectangle
CO723218 Nesting Dies, Roses
CO723047 Nesting Dies, Scallop Rectangle
CO721995 Gemstones Pink Flamingo
CO721971 Glitzin Glamour Crystalina
C0721964 Foam Mounting Tape 12mm
CO721985 Double Sided Tape 6mm
CO721971 Glitzin Glamour Crystalina
C0721964 Foam Mounting Tape 12mm
CO721985 Double Sided Tape 6mm
.png)


6 comments