AdhesiveBannerCouture FlowersDesign Team 2015GemstonesOff The PagePartyPatterned PapersPerfectly Petite DoiliesToolsTracey RohwederVintage Rose Garden
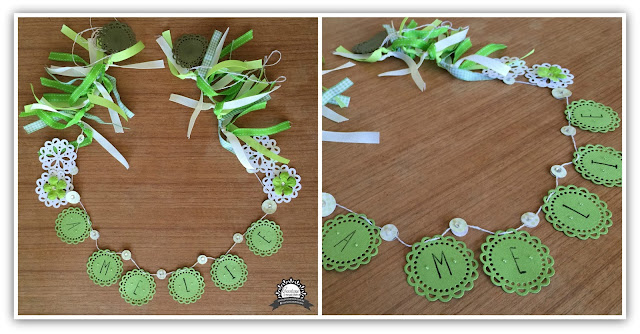
Petitie Doily Banner by Tracey Rohweder
#couturecreationsaus
Thanks for visiting the Couture Creations blog today!
Tracey R with you to share a name banner I made for my daughter. As soon as I saw the new Perfectly Petite Doilies range, I imagined them strung up with ribbons, and hanging on the wall. I love tiny doilies on anything! And by using them for more than your cards or scrapbook layouts, you are getting even better value for your crafting dollar. This range is so versatile and petite, I can't wait to share them with you! So let's get crafting!


Couture Creations Products Used
Tracey R with you to share a name banner I made for my daughter. As soon as I saw the new Perfectly Petite Doilies range, I imagined them strung up with ribbons, and hanging on the wall. I love tiny doilies on anything! And by using them for more than your cards or scrapbook layouts, you are getting even better value for your crafting dollar. This range is so versatile and petite, I can't wait to share them with you! So let's get crafting!

This name banner was a surprise for my daughter in her favourite colour green, but of course you can choose any colour you like. They'd look gorgeous in the purple tones of our Hearts Ease Collection.
This project used the Dandie Floral die for the green letters in the middle and the
Lotus Daily die for the white doilies either side of the name.

Be sure to check out the entire range of Perfectly Petite Doilies here.
There are 12 in the set and they are just so pretty you'll want them all!
I cut the doilies from Ultimate Crafts Cardstock and because I used the Quick Release Die Paper, they came out beautifully after one pass. No picking out the little bits!

You'll need enough Dandie Floral Die cuts to spell your chose name or word, plus two for the ends, and 4 of the Lotus Daily dies. I had two left over Dandie Floral dies from another project so I used them on the on either end. They were also inked with bronze so give a nice contrast.

I stamped the letters straight onto the Dandie Floral die cuts

And threaded all the doilies onto white and gold twine.
I've punched some little circles from a piece of Vintage Rose paper and will placed two circles secured with a Mini Glue Spot between each doily. This will keep them in place, but still allow for a little but of movement.

Using the LED Precision Tweezers & Mini Glue spots (I simply can't do without these!)
I've adhered the two circles together catching the twine in the middle.


Time for some flowers!
I've coloured my white flowers (these ones are the new Tied Dyed & Jewelled Florettes) with green spritz to match my cardstock. The Non-Stick Craft mat is the perfect place to do it!
Not only does it clean up easily when you're done but you can also use the extra spritz!

I've simply put some white card stock on top of the left over spray and TA-DA!
I just made my own coloured paper. Perfect for another project - be it a card or on a scrapbook layout. You could even use it to die cut out! And you'll never get the same pattern twice. So you'll always have a one-of-a-kind background and even more exciting - that you made yourself.

I've used Crystal Gemstones & Green Envy 2mm Gemstones to bling up my banner, before adding my flowers with Mini Glue Spots.

The final touch is to raid your ribbon stash for coordinating colours and tie lengths at either end.
I just used a single knot, and love the shaggy look it gives.
I've then added the final two doilies at each end to secure the twine.


You could make this for any occasion - Christmas, Birthday, Christening, Wedding, New Baby etc
The possibilities are endless!

Be sure to check the Couture Creations Blog to be inspired
by the amazing ladies on the Design Team.
You can also follow Couture Creations on
Have a crafty day!
Tracey R
xx


3 comments